Frame-by-Frame Animation
Creating the ActivityStart by creating the basic XML layout file for our test-animation activity screen
Listing 6-1. XML Layout File for the Animation Test Harness
<?xml version="1.0" encoding="utf-8"?>
<!—filename: /res/layout/frame_animations_layout.xml -->
<LinearLayout xmlns:android="http://schemas.android.com/apk/res/android"
android:orientation="vertical"
android:layout_width="fill_parent"
android:layout_height="fill_parent"
>
<TextView android:id="@+id/textViewId1"
android:layout_width="fill_parent"
android:layout_height="wrap_content"
android:text="Debug Scratch Pad"
/>
<Button
android:id="@+id/startFAButtonId"
android:layout_width="fill_parent"
android:layout_height="wrap_content"
android:text="Start Animation"
/>
<ImageView
android:id="@+id/animationImage"
android:layout_width="fill_parent"
android:layout_height="wrap_content"
/>
</LinearLayout>
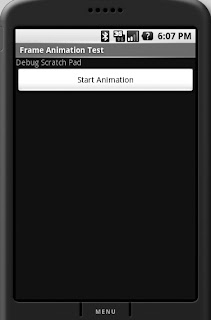
The first control is the debug-scratch text control, which is a simple TextView. Youthen add a button to start and stop the animation. The last view is the ImageView, where
you will play the animation. Once you have the layout, create an activity to load this view
Activity to Load the ImageView
public class FrameAnimationActivity extends Activity
{
@Override
public void onCreate(Bundle savedInstanceState)
{
super.onCreate(savedInstanceState);
setContentView(R.layout.frame_animations_layout);
}
}
You will be able to run this activity from any menu item you might have in your current
application by executing the following code:
Intent intent = new Intent(inActivity,FrameAnimationActivity.class);
inActivity.startActivity(intent);
At this point, you will see an activity that looks like the one in Figure 6-3
Adding Animation to the Activity
XML File Defining the List of Frames to be Animated
<animation-list xmlns:android="http://schemas.android.com/apk/res/android"android:oneshot="false">
<item android:drawable="@drawable/colored-ball1" android:duration="50" />
<item android:drawable="@drawable/colored-ball2" android:duration="50" />
<item android:drawable="@drawable/colored-ball3" android:duration="50" />
<item android:drawable="@drawable/colored-ball4" android:duration="50" />
<item android:drawable="@drawable/colored-ball5" android:duration="50" />
<item android:drawable="@drawable/colored-ball6" android:duration="50" />
<item android:drawable="@drawable/colored-ball7" android:duration="50" />
<item android:drawable="@drawable/colored-ball8" android:duration="50" />
</animation-list>
Each frame points to one of the colored-ball images you have assembled through their
resource IDs. The animation-list tag essentially gets converted into an AnimationDrawable
object representing the collection of images. You will then need to set this Drawable as a background
resource for our ImageView in the sample. Assuming that the file name for this XML file
is frame_animation.xml and that it resides in the /res/drawable subdirectory, you can use the
following code to set the AnimationDrawable as the background of the ImageView:
view.setBackGroundResource(Resource.drawable.frame_animation);
Complete Code for the Frame-by-Frame Animation Test
@Override
public void onCreate(Bundle savedInstanceState)
{
super.onCreate(savedInstanceState);
setContentView(R.layout.frame_animations_layout);
this.setupButton();
}
private void setupButton()
{
Button b = (Button)this.findViewById(R.id.startFAButtonId);
b.setOnClickListener(
new Button.OnClickListener(){
public void onClick(View v)
{
parentButtonClicked(v);
}
});
}
private void parentButtonClicked(View v)
{
animate();
}
private void animate()
{
ImageView imgView = (ImageView)findViewById(R.id.imageView);
imgView.setVisibility(ImageView.VISIBLE);
imgView.setBackgroundResource(R.drawable.frame_animation);
AnimationDrawable frameAnimation =
(AnimationDrawable) imgView.getBackground();
if (frameAnimation.isRunning())
{
frameAnimation.stop();
}
else
{
frameAnimation.stop();
frameAnimation.start();
}
}
}//eof-class

No comments:
Post a Comment